掲題の作業を実施する。
環境としては
・さくらVPS(石狩)2コア、1GBメモリ
・domain:h-sol.jp
・Debian11 Bullseye
・Bind+Postfix+Dovecot+Apache+MariaDB
・fail2ban導入済
という構成。まずは、ipv6の環境を、さくらvpsのコントロールパネルから、サーバ詳細の画面に遷移する。
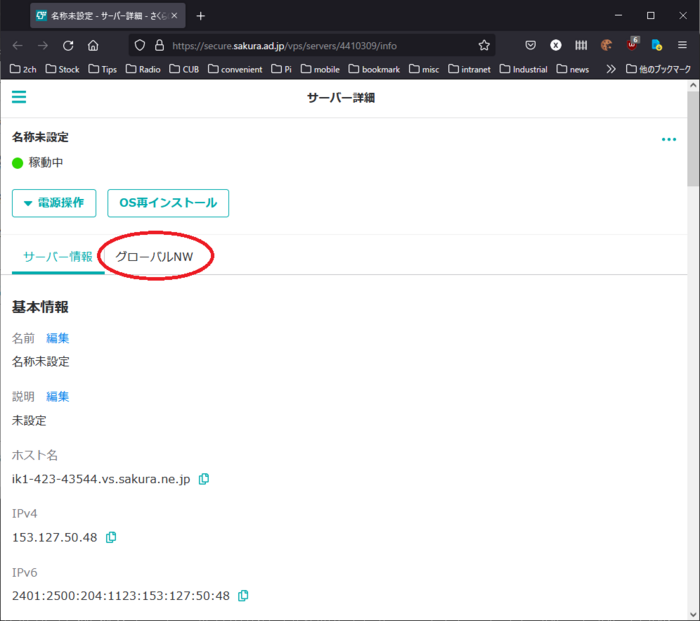
次に画面の赤丸のグローバルNWの画面に遷移する。
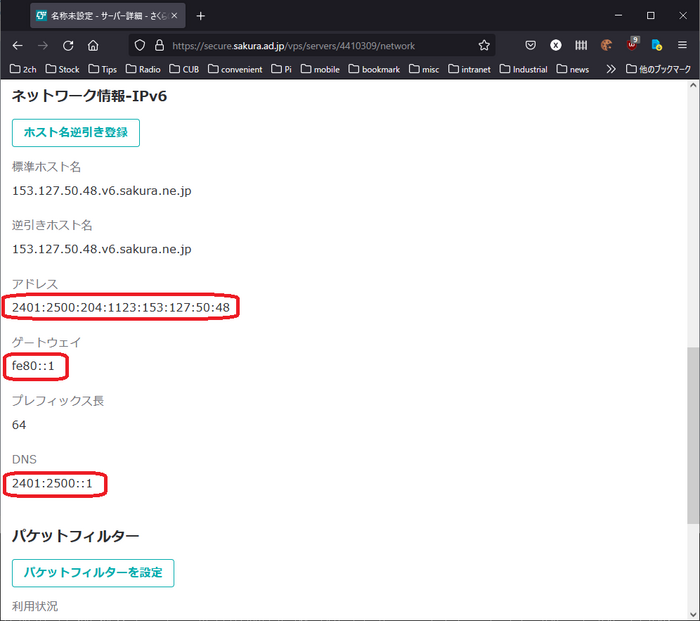 ここで参照するのが、それぞれ赤丸をした項目。
IPv6アドレス
ゲートウェイ
(IPv6)DNS
の3つだ。これを、/etc/network/interfacesにipv6の定義を追記する(赤字部分)
# This file describes the network interfaces available on your system
# and how to activate them. For more information, see interfaces(5).source /etc/network/interfaces.d/*
# The loopback network interface
auto lo
iface lo inet loopback# The primary network interface
allow-hotplug ens3
iface ens3 inet static
address 153.127.50.48/23
gateway 153.127.50.1
# dns-* options are implemented by the resolvconf package, if installed
dns-nameservers 210.188.224.10
dns-search vs.sakura.ne.jp
#
iface ens3 inet6 static
address 2401:2500:204:1123:153:127:50:48
netmask 64
gateway fe80::1
accept_ra 0
autoconf 0
privext 0
dns-nameservers 2401:2500::1
とする。
address : IPv6アドレス
(netmask : プレフィックス長 ->これはどこも64らしい)
gateway : IPv6のルータ
(acccept_ra / autoconf / privext : さくらから固定IPv6が割り振られているので0)
dns-nameservers : さくら(石狩)のリージョンによってネームサーバを指定
という設定
(詳細はman 5 interfaces)
ここで再起動して、IPv6設定を有効化する。
次に各サービスへのIPv6記述の追加。
BindではAAAAの項を追加する。
@ IN AAAA 2401:2500:204:1123:153:127:50:48
Fail2banでは、/etc/fail2ban/action.d/iptables-common.localに赤字部分を追記。
[Init]
blocktype = DROP
protocol = all[Init?family=inet6]
blocktype = DROP
protocol = all
postfixでは、/etc/postfix/main.cfにて
# inet_protocols = ipv4
↓
inet_protocols = all
とする。
Apacheはホスト名ベースのVirtualhostを使っているので、特に変更なし。
なお、クライアント側の話であるが
家鯖からcurlで自鯖のアドレスを取得しているが、
curl -s https://h-sol/cgi-bin/checkip2
→自宅に割り振られたv6アドレスが返ってくるcurl -4 -s https://h-sol/cgi-bin/checkip2
→敢えてIPv4でアドレスを取得する
というように変更した。
(2022年6月7日記)
コメント