「fail2ban」と一致するもの

FreeBSD-14-3R mailserver

  • 投稿日:
  • by
  • カテゴリ:

作業メモ

FreeBSD-14,3RをRaspberry Pi 3Bに接続したUSB SSDにインストールする作業手順


raspi-os上でraspberry Pi imagerにてFreeBSDのイメージをSSDに書く。

Raspberry Pi Imagerを使うのが良い。


/elf/config.txt mmcの行をコメントアウト

これは不要


以下の手順はRpi3で必要だったが、Rpi4では不要であった。すんなりとSSDから立ち上がる。

別機のFreeBSD(Rpi/amd86を問わず)にて

pkg install rpi-firmware

すると、

/usr/local/share/rpi-firmware 以下にファイルが生成される

microSD の FAT 領域をマウント
/usr/local/share/rpi-firmware 以下のファイルをコピー
onfig.txt arm64用ではないもので上書きされてしまったので config_rpi3.txt をコピー

で、起動するディスクが完成する。手順;

# mount_msdosfs /dev/da0s1 /media
# cp -r /usr/local/share/rpi-firmware/* /media
# cp /media/config_rpi3.txt /media/config.txt


これだけではダメでraspberry pi osでUSBブートを有効にするSDカードで起動

\boot/firmware/config.txtの末尾に以下を記載したもの

program_usb_boot_mode=1
program_usb_boot_timeout=1

その後、シャットダウン。


次にFreBSDのSSDを挿入して立ち上げる。

その後はいつもの手順

/etc/rc.conf でIP固定

/etc/ssh/sshd_config でsshアクセス有効にする

pkg install pkg -y

これがsslエラーとかで動かないときはntpの時刻合わせが必要。
service ntpdate onestart

pkg install -y samba420-4.20.7_10

アカウント関係の設定

pkg install -y postfix-sasl cyrus-sasl dovecot bind920 bind-tools maildrop spamassassin py311-fail2ban-1.1.0_5 expect wget

mkdir -p /usr/local/openssl/private

maildropのおまじない ここ参照。

以上でできるはず

(2025/07/26 記)

freebsd-update(FreeBSD 13.1 → 13.2 アップデート)

  • 投稿日:
  • by
  • カテゴリ:

半年ほど投稿をサボってしまった。

さて、FreeBSD.orgを見たところ、4月11日に、13.2-RELEASEが配布開始とのこと。

そこで、前回の、freebsd-update(FreeBSD 13 → 13.1 アップデート)と同様に

freebsd-update(FreeBSD 13.1 → 13.2 アップデート)

を実施する。

環境は、

Rpi3B(hostname="rpi3x.smbdom.local")
SSD500G (USB2)
FreeBSD 13R -> 13.1Rにアップデート
bind+postfix+dovecot+spamassassin+fail2ban のメール鯖構成

といったもの。

以下、冗長だが、手順;

Last login: Thu Apr 20 17:16:06 2023 from aopen.smbdom.local
FreeBSD 13.1-RELEASE-p6 GENERIC
Welcome !
makoto@rpi3x:~ % su -
password:
root@rpi3x:~ # freebsd-update upgrade -r 13.2-RELEASE
src component not installed, skipped
Looking up update.FreeBSD.org mirrors... 2 mirrors found.
Fetching metadata signature for 13.1-RELEASE from update1.freebsd.org... done.
Fetching metadata index... done.
Fetching 1 metadata patches. done.
Applying metadata patches... done.
Fetching 1 metadata files... done.
Inspecting system... done.

The following components of FreeBSD seem to be installed:
kernel/generic kernel/generic-dbg world/base world/base-dbg

The following components of FreeBSD do not seem to be installed:

Does this look reasonable (y/n)?


Fetching metadata signature for 13.2-RELEASE from update1.freebsd.org... done.
Fetching metadata index... done.
Fetching 1 metadata patches. done.
Applying metadata patches... done.
Fetching 1 metadata files... done.
Does this look reasonable (y/n)? y

Fetching metadata signature for 13.2-RELEASE from update1.freebsd.org... done.
Fetching metadata index... done.
Fetching 1 metadata patches. done.
Applying metadata patches... done.
Fetching 1 metadata files... done.
Inspecting system... done.
Fetching files from 13.1-RELEASE for merging... done.
Preparing to download files... done.
Attempting to automatically merge changes in files... done.

The following file could not be merged automatically: /etc/motd.template
Press Enter to edit this file in vi and resolve the conflicts
manually...
(エディターで変更なく抜ける)
/var/db/freebsd-update/merge/new//etc/motd.template: 1 lines, 10 characters.

The following file could not be merged automatically: /etc/ssh/sshd_config
Press Enter to edit this file in vi and resolve the conflicts
manually...
(エディターで変更なく抜ける)
The following changes, which occurred between FreeBSD 13.1-RELEASE and
FreeBSD 13.2-RELEASE have been merged into /etc/passwd:
--- current version
+++ new version
@@ -1,7 +1,5 @@
-# $FreeBSD$
-#
 root:*:0:0:Charlie &:/root:/bin/csh
 toor:*:0:0:Bourne-again Superuser:/root:
 daemon:*:1:1:Owner of many system processes:/root:/usr/sbin/nologin
 operator:*:2:5:System &:/:/usr/sbin/nologin
 bin:*:3:7:Binaries Commands and Source:/:/usr/sbin/nologin
Does this look reasonable (y/n)?y

The following changes, which occurred between FreeBSD 13.1-RELEASE and
FreeBSD 13.2-RELEASE have been merged into /etc/ssh/sshd_config:
Does this look reasonable (y/n)? y

(nを入力すると処理が中断してしまうので。yで継続していく。
 一方で、後でreboot前に、例えば別ターミナルを開いて、
 バックアップしておいたmotd.templateとsshd_configを上書きする。
 sshd_configが不正な場合、sshで接続できなくなる。)

To install the downloaded upgrades, run "/usr/sbin/freebsd-update install".
root@rpi3x:~ # /usr/sbin/freebsd-update install
src component not installed, skipped
Installing updates...
Kernel updates have been installed.  Please reboot and run
"/usr/sbin/freebsd-update install" again to finish installing updates.
(もう一度"/usr/sbin/freebsd-update install"を実行)
root@rpi3x:~ # /usr/sbin/freebsd-update install
src component not installed, skipped
Installing updates...install: ///var/db/etcupdate/current/etc/rc.d/growfs_fstab: No such file or directory
install: ///var/db/etcupdate/current/etc/rc.d/var_run: No such file or directory
install: ///var/db/etcupdate/current/etc/rc.d/zpoolreguid: No such file or directory
Scanning //usr/share/certs/blacklisted for certificates...
Scanning //usr/share/certs/trusted for certificates...
Scanning //usr/local/share/certs for certificates...
rmdir: ///usr/tests/usr.bin/timeout: Directory not empty
 done.
root@rpi3x:~ #
(ここで/etc/motd.templateと/etc/ssh/sshd_configが"元の状態"であることを確認する)

root@rpi3x:~ # reboot

Last login: Fri Apr 21 07:59:02 2023 from aopen.smbdom.local
FreeBSD 13.2-RELEASE releng/13.2-n254617-525ecfdad597 GENERIC
Welcome !
makoto@rpi3x:~ % su -
Password:
root@rpi3x:~ #  freebsd-version -kur
13.2-RELEASE
13.2-RELEASE
13.2-RELEASE
root@rpi3x:~ #

上記でカッコ書きした部分の、

/etc/motd.template
/etc/ssh/sshd_config

の2つを、バックアップしておいて、reboot前に元に戻すことがコツかと思う。

(2023年4月20日)

さくらVPS(Debian Bullseye)をIPv6対応にする

掲題の作業を実施する。
環境としては

・さくらVPS(石狩)2コア、1GBメモリ
・domain:h-sol.jp
・Debian11 Bullseye
・Bind+Postfix+Dovecot+Apache+MariaDB
・fail2ban導入済

という構成。まずは、ipv6の環境を、さくらvpsのコントロールパネルから、サーバ詳細の画面に遷移する。

control-panel-1.png

次に画面の赤丸のグローバルNWの画面に遷移する。

control-panel-2.pngここで参照するのが、それぞれ赤丸をした項目。

IPv6アドレス
ゲートウェイ
(IPv6)DNS

の3つだ。これを、/etc/network/interfacesにipv6の定義を追記する(赤字部分)

# This file describes the network interfaces available on your system
# and how to activate them. For more information, see interfaces(5).

source /etc/network/interfaces.d/*

# The loopback network interface
auto lo
iface lo inet loopback

# The primary network interface
allow-hotplug ens3
iface ens3 inet static
address 153.127.50.48/23
gateway 153.127.50.1
# dns-* options are implemented by the resolvconf package, if installed
dns-nameservers 210.188.224.10
dns-search vs.sakura.ne.jp
#
iface ens3 inet6 static
address 2401:2500:204:1123:153:127:50:48
netmask 64
gateway fe80::1
accept_ra 0
autoconf 0
privext 0
dns-nameservers 2401:2500::1

とする。

address : IPv6アドレス
(netmask : プレフィックス長 ->これはどこも64らしい)
gateway : IPv6のルータ
(acccept_ra / autoconf / privext : さくらから固定IPv6が割り振られているので0)
dns-nameservers : さくら(石狩)のリージョンによってネームサーバを指定

という設定
(詳細はman 5 interfaces)
ここで再起動して、IPv6設定を有効化する。

次に各サービスへのIPv6記述の追加。
BindではAAAAの項を追加する。

@ IN AAAA 2401:2500:204:1123:153:127:50:48

Fail2banでは、/etc/fail2ban/action.d/iptables-common.localに赤字部分を追記。

[Init]
blocktype = DROP
protocol = all

[Init?family=inet6]
blocktype = DROP
protocol = all

postfixでは、/etc/postfix/main.cfにて

# inet_protocols = ipv4
  ↓
inet_protocols = all

とする。
Apacheはホスト名ベースのVirtualhostを使っているので、特に変更なし。

なお、クライアント側の話であるが
家鯖からcurlで自鯖のアドレスを取得しているが、

curl -s https://h-sol/cgi-bin/checkip2
 →自宅に割り振られたv6アドレスが返ってくる

curl -4 -s https://h-sol/cgi-bin/checkip2
 →敢えてIPv4でアドレスを取得する

というように変更した。

(2022年6月7日記)

freebsd-update(FreeBSD 13 → 13.1 アップデート)

  • 投稿日:
  • by
  • カテゴリ:

freebsd-update なるコマンドで、FreeBSD 13Rを13.1Rにアップデートした際の作業記録。

環境は、

Rpi3B(hostname="rpi3x.smbdom.local")
SSD500G (USB2)
FreeBSD 13R -> 13.1Rにアップデート
bind+postfix+dovecot+spamassassin+fail2ban のメール鯖構成

といったもの。
ざっくり結論。下記のコマンドを順次出す。

freebsd-update upgrade -r 13.1-RELEASE
reboot
login
su -
/usr/sbin/freebsd-update install
pkg update && pkg upgrade -y
reboot
rm -rf /var/db/freebsd-update/

以下、冗長ではあるが、出力を下記に残す。
入力したところは赤字とする。

root@rpi3x:~ # freebsd-update upgrade -r 13.1-RELEASE
src component not installed, skipped
Looking up update.FreeBSD.org mirrors... 2 mirrors found.
Fetching public key from update1.freebsd.org... done.
Fetching metadata signature for 13.0-RELEASE from update1.freebsd.org... done.
Fetching metadata index... done.
Fetching 2 metadata files... done.
Inspecting system... done.

The following components of FreeBSD seem to be installed:
kernel/generic kernel/generic-dbg world/base world/base-dbg

The following components of FreeBSD do not seem to be installed:

Does this look reasonable (y/n)? y

Fetching metadata signature for 13.1-RELEASE from update1.freebsd.org... done.
Fetching metadata index... done.
Fetching 1 metadata patches. done.
Applying metadata patches... done.
Fetching 1 metadata files... done.
Inspecting system... done.
Fetching files from 13.0-RELEASE for merging... done.
Preparing to download files... done.
Fetching 5422 patches.....10....20....30....40....50....60....70....80....90....100....110....120....130....140....150....160....170....180....190....200....210....220....230....240....250....260....270....280....290....300....310....320....330....340....350....360....370....380....390....400....410....420....430....440....450....460....470....480....490....500....510....520....530....540....550....560....570....580....590....600....610....620....630....640....650....660....670....680....690....700....710....720....730....740....750....760....770....780....790....800....810....820....830....840....850....860....870....880....890....900....910....920....930....940....950....960....970....980....990....1000....1010....1020....1030....1040....1050....1060....1070....1080....1090....1100....1110....1120....1130....1140....1150....1160....1170....1180....1190....1200....1210....1220....1230....1240....1250....1260....1270
(略)
....5280....5290....5300....5310....5320....5330....5340....5350....5360....5370....5380....5390....5400....5410....5420. done.
Applying patches... done.
Fetching 484 files... ....10....20....30....40....50....60....70....80....90....100....110....120....130....140....150....160....170....180....190....200....210....220....230....240....250....260....270....280....290....300....310....320....330....340....350....360....370....380....390....400....410....420....430....440....450....460....470....480.. done.
Attempting to automatically merge changes in files... done.

The following file could not be merged automatically: /etc/ssh/sshd_config
Press Enter to edit this file in vi and resolve the conflicts
manually...

(エンター押すと、エディターの画面が出る
 基本的に昔のままで良さそう)

To install the downloaded upgrades, run "/usr/sbin/freebsd-update install".
Kernel updates have been installed. Please reboot and run
"/usr/sbin/freebsd-update install" again to finish installing updates.
root@rpi3x:~ # reboot

Last login: Thu May 19 15:06:21 2022 from 192.168.0.69
FreeBSD 13.1-RELEASE releng/13.1-n250148-fc952ac2212 GENERIC
Welcome !
makoto@rpi3x:~ % su -
Password:
root@rpi3x:~ # /usr/sbin/freebsd-update install
src component not installed, skipped
Installing updates...
Installing updates...install: ///var/db/etcupdate/current/etc/rc.d/sysctl_lastload: No such file or directory
install: ///var/db/etcupdate/current/etc/rc.d/tlsclntd: No such file or directory
install: ///var/db/etcupdate/current/etc/rc.d/tlsservd: No such file or directory
install: ///var/db/etcupdate/current/etc/rc.d/zfskeys: No such file or directory
root@rpi3x:~ # pkg update && pkg upgrade -y

ここで/etc/ssh/sshd_configと/etc/ttysを別機から取り寄せ。
(たぶん両ファイルが壊れた?)


root@rpi3x:~ # reboot

root@rpi3x:~ # rm -rf /var/db/freebsd-update/

以上

(2022/05/20)

Fail2banでalready banと出たときの対処

fail2ban+iptable(debian)の環境。
fail2banからiptableでDROP済(already banned)なのに、繰り返し攻撃してくる。
相手は変造パケットを投げてきているのであろうか。返事をしてしまっている。

1.png

そこで、下記の iptable コマンド;

iptables -A INPUT -s IPAddress -j DROP

をfail2banとは別に発行すると、しつこい攻撃を撃退できることが分かった。
正当な流儀としては、fail2banのaction.dとかを弄るべきであろう。
しかしながらとりあえず(対症療法で)、シェルスクリプト。

#/bin/sh

if [ -e /tmp/banlist.txt ]; then
# echo "/tmp/reban exist"
true
else
echo "create /tmp/banlist.txt"
touch /tmp/banlist.txt
exit 0
fi

REBAN=`tail /var/log/fail2ban.log|grep -m1 already|awk {'print $7'}`

if [ "${REBAN}" = "" ]; then
# echo "ipaddress is null"
exit 0
else
while read LINE
do
if [ "${LINE}" = "${REBAN}" ]; then
# echo "already banned"
exit 0
else
# echo ${REBAN} >> /tmp/banlist.txt
# `iptables -A INPUT -s ${REBAN} -j DROP`
# echo " ${REBAN} is reBANNED !"
true
fi
done < /tmp/banlist.txt
fi

`iptables -A INPUT -s ${REBAN} -j DROP`
echo ${REBAN} >> /tmp/banlist.txt
echo "${REBAN} is reBANNED !"

exit 0

crontabにて、5分に1回、回している。

2.png

無事撃退できた模様。

→後日談としてiptable-all-portで遮断すれば良さそうだ。

(2022/05/14 記)

----
追記

fail2banのactionに着目した。
デフォルトのTCPで拒否しているところ、UDPやICMPも含む、全プロトコルをDROPさせる、"all"の設定にしてみた。scriptが不要か悩む。

# cat /etc/fail2ban/action.d/iptables-common.local
[Init]
blocktype = DROP
protocol = all
#

しばらくscriptを併用して様子をうかがう。

(2022/05/17)

---
さらに追記

fail2banで"protocol=all"としただけでは撃退できない。
シェルスクリプトが効いて、遮断した様子。

fail2ban_sh.png

本スクリプトでiptableコマンドの送出が必要のようだ。
(iptableのchain INPUTで当該IPアドレスをDROP追加するルール。)

(2022/05/18)


さらに追記

jail.d/*.confの設定で、

banaction = iptables-allports

を追加した。シェルスクリプトを回す必要は無くなった。

sshd.conf

[sshd]
mode = aggressive
enabled = true
backend = %(sshd_backend)s
logpath = %(sshd_log)s
findtime = 600
maxretry = 3
bantime = 2d
banaction = iptables-allports

postfix.conf

[postfix]
mode = aggressive
enabled = true
backend = %(postfix_backend)s
logpath = %(postfix_log)s
findtime = 3600
maxretry = 3
bantime = 2d
banaction = iptables-allports

dovecot.conf

[dovecot]
mode = aggressive
enabled = true
backend = %(dovecot_backend)s
logpath = %(dovecot_log)s
findtime = 600
maxretry = 5
bantime = 2d
banaction = iptables-allports

今回新たに追加のrecidive.conf

[recidive]
enabled = true
bantime = 3mo
findtime = 9d
maxretry = 10
banaction = iptables-allports

すべてのポートで拒否とした。

crontabのエントリからスクリプトを除外した。

(2022/05/27)

fail2banの設定見直し

  • 投稿日:
  • by
  • カテゴリ:

/var/log/mail.logを見ていると、あるIPアドレスからAuthの警告が出ている。saslの穴を探っているようだ。
前回記事でのインストール方法を見直すこととした。

環境は

さくらVPS(石狩)
debian
postfix + dovecot
fail2ban + iptables

の構成。fail2banは、0.11.2

# fail2ban-client -V
0.11.2
#

まずは、/etc/fail2ban/jail.d/postfix.conf なるファイルを準備、導入。
/etc/fail2ban/jail.localなるファイルを置いて/etc/fail2ban/jail.confをoverrideする機構であるが、/etc/fail2ban/jail.d/ 以下のファイルもIncludeされるので、サービスごとにconfファイルを置くことにした。

[postfix]
mode = aggressive
enabled = true
backend = %(postfix_backend)s
logpath = %(postfix_log)s
findtime = 600
maxretry = 3
bantime = 2d

modeについては/etc/fail2ban/filters.d/postfix.confで定義されているfilterのルールで何を使うかを定義する。"aggressive"だと、(次郎系らーめんでいうところの)「トッピング全部乗せ」のオーダになる。sasl-authだけ気になるのであれば、mode = auth とか。他にも、rblとかddosなどのパラメータを選択可能。
backend は変数の中に、/etc/fail2ban/filters.d/postfix.conf を指すようになってるようだ。fullpathで書いても動いた。backend についても同様。/var/log/mail.log になっている。

さて同様にsshdについても/etc/fail2ban/jail.d/sshd.confを作る。

[sshd]
mode = aggressive
enabled = true
backend = %(sshd_backend)s
logpath = %(sshd_log)s
findtime = 600
maxretry = 3
bantime = 2d

さらに/etc/fail2ban/jail.d/dovecot.conf

[dovecot]
mode = aggressive
enabled = true
backend = %(dovecot_backend)s
logpath = %(dovecot_log)s
findtime = 600
maxretry = 5
bantime = 2d

デフォルトの状態だと、tcpを定義portでrefuseするが、iptableでBANしてもしつこくsshdにattackしてくるのが居る。応急的にiptableでDROPするよう、とりあえず、手動で以下を発出。

# iptables -A INPUT -s 142.93.164.94 -j DROP

ここから、本格的にiptableでDROPとするやりかた。
fail2banのaction書き換えを別途調査したら見つかった。
/etc/ffail2ban/action.d/iptables-common.confに

[INCLUDES]

after = iptables-blocktype.local
iptables-common.local
# iptables-blocktype.local is obsolete

とある。
そこで、/etc/fail2ban/action.d/iptables-common.local なるファイルを作り、

[Init]
blocktype = DROP

と定義する。

ここでfail2banを再起動。

systemctl reload fail2ban

とした。が、ルールが一部更新されなかったので、

/etc/init.d/fail2ban stop
rm /var/lib/fail2ban/fail2ban.sqlite3
/etc/init.d/fail2ban start

で、サービスを止めて、BANのlistをクリアし、再スタートした。

root@ik1-423-43544:~# fail2ban-client status
Status
|- Number of jail: 3
`- Jail list: dovecot, postfix, sshd
root@ik1-423-43544:~# fail2ban-client status sshd
Status for the jail: sshd
|- Filter
| |- Currently failed: 0
| |- Total failed: 0
| `- File list: /var/log/auth.log
`- Actions
|- Currently banned: 1
|- Total banned: 1
`- Banned IP list: 142.93.164.94
root@ik1-423-43544:~# fail2ban-client status postfix
Status for the jail: postfix
|- Filter
| |- Currently failed: 1
| |- Total failed: 2
| `- File list: /var/log/mail.log
`- Actions
|- Currently banned: 5
|- Total banned: 5
`- Banned IP list: 174.138.10.169 193.56.29.119 5.34.207.52 5.34.207.58 77.247.110.151
root@ik1-423-43544:~# fail2ban-client status dovecot
Status for the jail: dovecot
|- Filter
| |- Currently failed: 0
| |- Total failed: 0
| `- File list: /var/log/mail.log
`- Actions
|- Currently banned: 0
|- Total banned: 0
`- Banned IP list:
root@ik1-423-43544:~#

動作しているのを確認した。

# iptables -L

で。iptable で弾いている様子が確認できる。

f2b.png

iptableでDROP定義に変わった。

あと、

less /var/log/fail2ban.log

でfail2banの動作環境を監視すると、findtimeとかbantime、maxretryの調整に役立つ。

(追記 2022/02/07)

FreeBSD-13R(arm64)でメールサーバとWebサーバを立てた作業記録

  • 投稿日:
  • by
  • カテゴリ:

1.環境

・Raspberry Pi 4 を推奨 ※3B+で残りメモリ25MB、ちょっとキツそう。

fbsd2-210909.png

・OSはFreeBSD-13.0-RELEASE-arm64-aarch64-RPI.img.xz

・WordPressまでの動作を確認。
 (追記)MovavleType対応を別記事に纏めた。

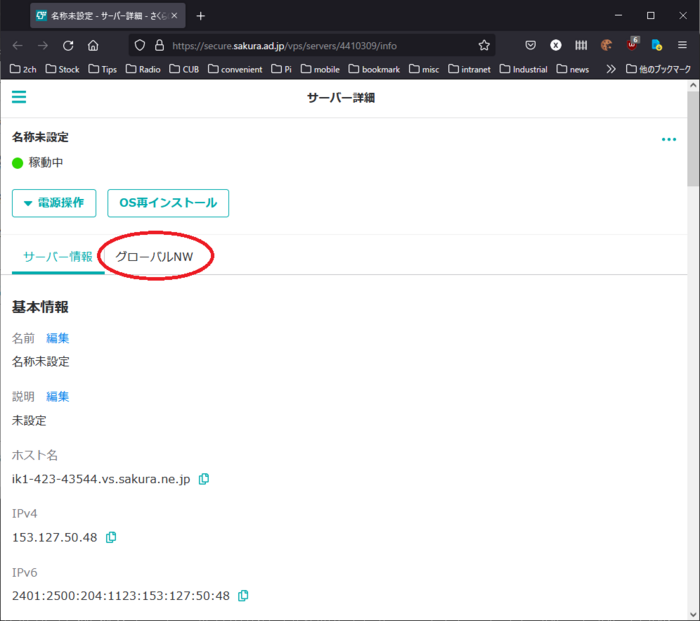
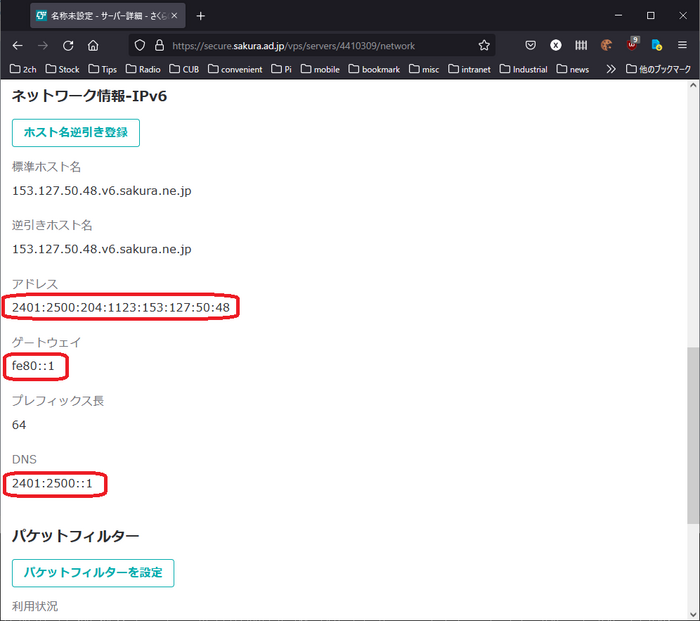
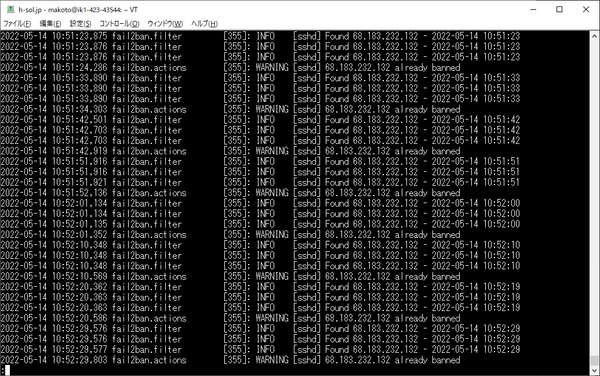
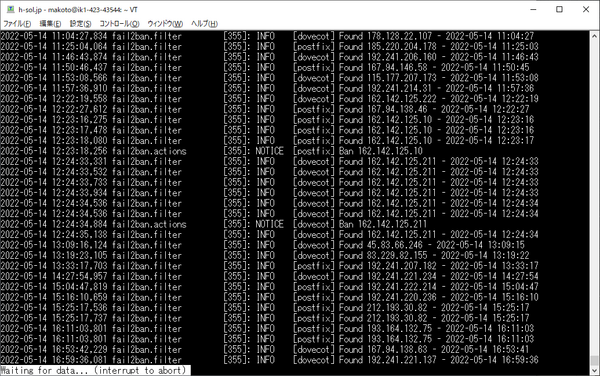
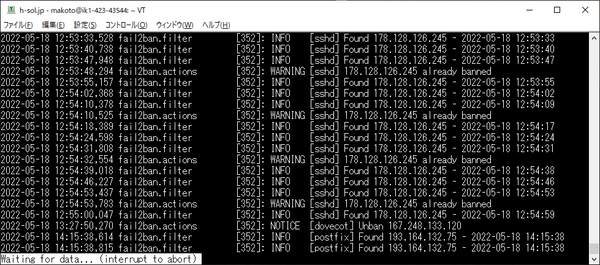
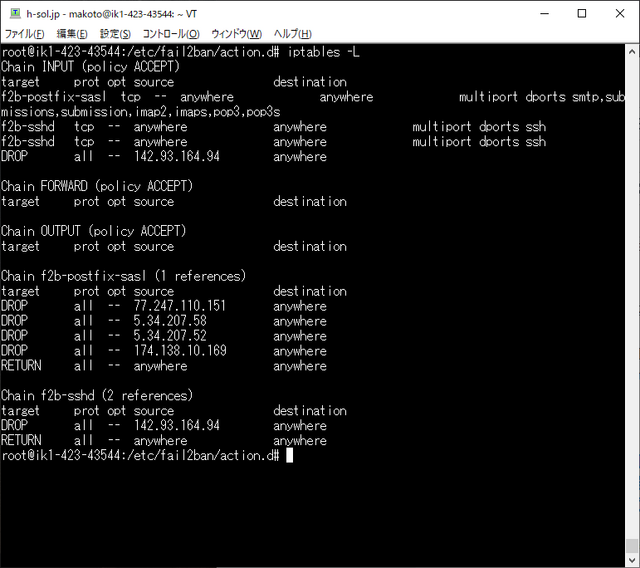
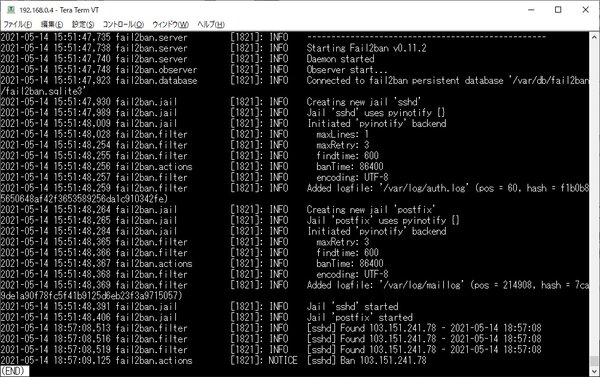
・sshが有効になったら、fail2banとpfの設定を行なう。(既出)

2.メールサーバー

・現用中の環境で構築する。
 Bind + Postfix + Dovecot (sasl) + maildrop + spamassassin

追記(2021/10/20):当初、cyrus-sasl-saslauthd を入れていたが、現在のところPAM認証であり、cyrus-saslの機能は使っていない。そこで、dovecot-saslとなるよう設定を変更した。むろん、sasldbとかldapを使う場合には、cyrus_sasl_saslauthdを導入すべきである。情報元

・ということで、packageのインストールは以下;

pkg install -y postfix-sasl dovecot bind916 bind-tools maildrop spamassassin

3.Webサーバー

・今回、新規に構築する。

・WordPressとMovableTypeが稼働するのを目的にする
 Apache24 + mariaDB105 + PHP74

・まず、ApacheとmariaDB105のパッケージを入れる。

pkg install -y apache24 mariadb105-server

・/etc/rc.confに以下を追加

apache24_enable="YES"
apache24_http_accept_enable="YES"
php_fpm_enable="YES"
mysql_enable="yes"

続いてmysql_serverを起動

/usr/local/etc/rc.d/mysql-server start

mysqlサーバの仕上げとして、mysql_secure_installation を実行。
赤字部分のように応答する。

mysql_secure_installation

-----------------------------

root@fbsd2:~ # mysql_secure_installation

NOTE: RUNNING ALL PARTS OF THIS SCRIPT IS RECOMMENDED FOR ALL MariaDB
SERVERS IN PRODUCTION USE! PLEASE READ EACH STEP CAREFULLY!

In order to log into MariaDB to secure it, we'll need the current
password for the root user. If you've just installed MariaDB, and
haven't set the root password yet, you should just press enter here.

Enter current password for root (enter for none):(rootパスワード)
OK, successfully used password, moving on...

Setting the root password or using the unix_socket ensures that nobody
can log into the MariaDB root user without the proper authorisation.

You already have your root account protected, so you can safely answer 'n'.

Switch to unix_socket authentication [Y/n](Y)
Enabled successfully!
Reloading privilege tables..
... Success!


You already have your root account protected, so you can safely answer 'n'.

Change the root password? [Y/n] n
... skipping.

By default, a MariaDB installation has an anonymous user, allowing anyone
to log into MariaDB without having to have a user account created for
them. This is intended only for testing, and to make the installation
go a bit smoother. You should remove them before moving into a
production environment.

Remove anonymous users? [Y/n](Y)
... Success!

Normally, root should only be allowed to connect from 'localhost'. This
ensures that someone cannot guess at the root password from the network.

Disallow root login remotely? [Y/n](Y)
... Success!

By default, MariaDB comes with a database named 'test' that anyone can
access. This is also intended only for testing, and should be removed
before moving into a production environment.

Remove test database and access to it? [Y/n](Y)
- Dropping test database...
... Success!
- Removing privileges on test database...
... Success!

Reloading the privilege tables will ensure that all changes made so far
will take effect immediately.

Reload privilege tables now? [Y/n](Y)
... Success!

Cleaning up...

All done! If you've completed all of the above steps, your MariaDB
installation should now be secure.

Thanks for using MariaDB!
root@fbsd2:~ #

・phpのインストール。php74のバイナリをインストールする。

pkg install -y php74 php74-extensions php74-gd php74-mbstring php74-pear php74-gettext php74-iconv

pkg install -y php74-exif php74-fileinfo php74-ftp php74-pdo_mysql php74-mysqli php74-zip

pkg install -y mod_php74 php74-curl php74-gd php74-xml php74-xmlrpc php74-soap php74-intl php74-pecl-imagick

・続いて、php.iniファイルを雛形からコピーする。

cp /usr/local/etc/php.ini-production /usr/local/etc/php.ini

・/usr/local/etc/apach24/httpd.confを編集。
 書き換え必要な個所は以下;

mpm関係が鬼門と思う。

#LoadModule mpm_event_module libexec/apache24/mod_mpm_event.so
LoadModule mpm_prefork_module libexec/apache24/mod_mpm_prefork.so
#LoadModule mpm_worker_module libexec/apache24/mod_mpm_worker.so

と設定することで、稼働した。
以下の例を掲出してあるがあるが、phpをコンパイルしなおせという警告が出て、
Apache24が起動しない。→実は、defaultのhttpd.confが正解だった。ヒントこことかここ

LoadModule mpm_event_module libexec/apache24/mod_mpm_event.so
#LoadModule mpm_prefork_module libexec/apache24/mod_mpm_prefork.so
LoadModule proxy_module libexec/apache24/mod_proxy.so
LoadModule proxy_fcgi_module libexec/apache24/mod_proxy_fcgi.so
LoadModule socache_shmcb_module libexec/apache24/mod_socache_shmcb.so
LoadModule ssl_module libexec/apache24/mod_ssl.so

以下、全体のdiff;

diff httpd.conf.org httpd.conf
92c92
< #LoadModule socache_shmcb_module libexec/apache24/mod_socache_shmcb.so
---
> LoadModule socache_shmcb_module libexec/apache24/mod_socache_shmcb.so
129c129
< #LoadModule proxy_module libexec/apache24/mod_proxy.so
---
> LoadModule proxy_module libexec/apache24/mod_proxy.so
133c133
< #LoadModule proxy_fcgi_module libexec/apache24/mod_proxy_fcgi.so
---
> LoadModule proxy_fcgi_module libexec/apache24/mod_proxy_fcgi.so
148c148
< #LoadModule ssl_module libexec/apache24/mod_ssl.so
---
> LoadModule ssl_module libexec/apache24/mod_ssl.so
166c166
< #LoadModule cgid_module libexec/apache24/mod_cgid.so
---
> LoadModule cgid_module libexec/apache24/mod_cgid.so
169c169
< #LoadModule cgi_module libexec/apache24/mod_cgi.so
---
> LoadModule cgi_module libexec/apache24/mod_cgi.so
231d230
< # explicitly permit access to web content directories in other
265c264,265
< Options Indexes FollowSymLinks
---
> # Options Indexes FollowSymLinks
> Options +FollowSymLinks +Multiviews +ExecCGI
295a296,299
> <FilesMatch "\.php$">
> SetHandler "proxy:fcgi://127.0.0.1:9000/"
> </FilesMatch>
>
432c436
< #AddHandler cgi-script .cgi
---
> AddHandler cgi-script .cgi

PCからのアクセスできるよう、sambaを構成しておく。

さらにこの後、サーバのドメインが決まったら、letsencrypt を導入して、https化の作業など行う。

以上、備忘のため記す。

2021年8月26日

FreeBSD-13R(arm64) で、Fail2ban + pf を構成する

  • 投稿日:
  • by
  • カテゴリ:

ニフティというか、infoweb配下のIPアドレスなので、さくらVPSほどの攻撃は受けない。しかし、しばらくipアドレスが変わらなかったりすると、sshとかsmtp-authのポートめがけて、アタックが来ることがある。

そこで、Fail2banを構成することとした。

pkg update && pkg install py38-fail2ban

Debianでは定番通りiptable にNGアドレスが蓄積されるようにしたが、FreeBSDに対してはpfで制御するようにした。

まずは/etc/pf.confの設定;

見通しが悪いのでファイル全体を下記;

cat /etc/pf.conf

# define macros for each network interface
ext_if = "ue0"
icmp_types = "echoreq"
allproto = "{ tcp, udp, ipv6, icmp, esp, ipencap }"
privnets = "{ 127.0.0.0/8, 192.168.0.0/16, 172.16.0.0/12, 10.0.0.0/8 }"
set loginterface $ext_if
scrub in on $ext_if no-df random-id
# Anchor for fail2ban
anchor "f2b/*"

イーサデバイス名はrpi3では"ue0"。rpi4では"genet0"とする。(amd64ではハード構成に応じて) また、anchor "f2b/*" として、Fail2banで検知したホストをpfに連携するオマジナイを仕込む。

ウマく動くかテスト。

/etc/rc.d/pf start

ウマく動くようであれば、Fail2banのインストールと設定に移る。

root@fbsd:~ # pkg search fail2ban
pkg install py311-fail2ban-1.1.0Scans log files and bans IP that makes too many password failures
root@fbsd:~ # pkg install -y pkg install py311-fail2ban-1.1.0

として"py38-fail2ban"をインストールする。続いて/usr/local/etc/fail2ban/jail.d 以下に、下記3つのファイルを作成する。

root@fbsd:/usr/local/etc/fail2ban/jail.d # ls -al
total 16
drwxr-xr-x 2 root wheel 512 May 11 13:49 .
drwxr-xr-x 6 root wheel 1024 May 11 13:16 ..
-rw-r--r-- 1 root wheel 162 May 11 13:51 postfix-pf.conf
-rw-r--r-- 1 root wheel 157 May 11 13:38 ssh-pf.conf
root@fbsd:/usr/local/etc/fail2ban/jail.d # cat ssh-pf.conf
[sshd]
mode = aggressive
enabled = true
action = %(action_mw)s
filter = sshd
logpath = /var/log/auth.log
findtime = 600
maxretry = 3
bantime = 86400

root@fbsd:/usr/local/etc/fail2ban/jail.d # cat postfix-pf.conf
[postfix]
mode = aggressive
enabled = true
action = %(action_mw)s
backend = %(postfix_backend)s
logpath = %(postfix_log)s
findtime = 3600
maxretry = 3
bantime = 2d

root@fbsd:/usr/local/etc/fail2ban/jail.d # cat dovecot-pf.conf
[dovecot]
mode = aggressive
enabled = true
action = %(action_mw)s
backend = %(dovecot_backend)s
logpath = %(dovecot_log)s
findtime = 3600
maxretry = 3
bantime = 2d

root@fbsd:/usr/local/etc/fail2ban/jail.d #

1つはsshd用、もう一つはpostfix用だ。動作試験は

/usr/local/etc/rc.d/fail2ban start

になる。最後に/etc/rc.confの末尾に追加。

# pf and fail2ban
pf_enable="YES"
pf_flags=""
pflog_enable="YES"
pf_rules="/etc/pf.conf"
fail2ban_enable="YES"

こんな感じ。

fail2ban.jpgちゃんと動いているようだ。


2025年2月19日 追記

jail.d以下のファイルで、actionの部分が変わった。

action = %(action_mw)s

と定義する。

FreeBSDなメールサーバに必要なpostfix+sasl+dovecot, bind9を入れる

  • 投稿日:
  • by
  • カテゴリ:

FreeBSD-13Rが出たので、改訂(2021年4月30日)

環境はRaspberry Pi4B(4GB)。Pi3Aでも充分実用になった。

まず、pkgを入れる。
root@fbsd:~ # pkg

その後pkg update を忘れぬよう。
root@fbsd2:~ # pkg update
Updating FreeBSD repository catalogue...
Fetching meta.conf: 100% 163 B 0.2kB/s 00:01
Fetching packagesite.txz: 100% 6 MiB 447.6kB/s 00:14
Processing entries: 100%
FreeBSD repository update completed. 30270 packages processed.
All repositories are up to date.
root@fbsd2:~ #

さて、これから入れるpackageは

postfix-sasl
cyrus-sasl-saslauthd
dovecot
bind916
bind-tools
maildrop
spamassassin

を入れていく

# pkg install -y postfix-sasl cyrus-sasl-saslauthd dovecot bind916 bind-tools maildrop spamassassin

/etc/rc.conf を修正する。

hostname="fbsd.smbdom.local"
# hostname="pi.homeunix.net"
# ifconfig_DEFAULT="DHCP"
ifconfig_genet0="inet 192.168.0.4 netmask 0xffffff00"
defaultrouter="192.168.0.1"
#
# ipv6_enable="YES"
# ipv6_enable="YES"
# ipv6_network_interfaces="auto"
#
sshd_enable="YES"
#
#
# ntpd
# ntpdate_enable="NO"
ntpd_enable="YES"
ntpd_sync_on_start="YES"
#
#
# postfix
postfix_enable="YES"
sendmail_enable="NO"
sendmail_submit_enable="NO"
sendmail_outbound_enable="NO"
sendmail_msp_queue_enable="NO"
#
# dovecot
# saslauthd_enable="YES"
# saslauthd_flags="-a sasldb"
dovecot_enable="YES"
#
## growfs_enable="YES"
#
# ddclient change 200407 NO
# ddclient_enable="YES"
## ddclient_enable="NO"
#
# tcsd
## tcsd_enable="YES"
## tcsd_mode="emulator"
## tpmd_enable="YES"
#
# Samba
# samba_server_enable="YES"
# samba_enable="YES"
# nmbd_enable="YES"
# smbd_enable="YES"
# winbindd_enable="YES"
# samba_server_config="/usr/local/etc/samba/smb4.conf"
#
# bind
# Add the following lines to /etc/rc.conf to enable BIND:
named_enable="YES"
named_conf="/usr/local/etc/namedb/named.conf"
named_uid="bind"
#
# apache24
#apache24_enable="yes"
#apache24_http_accept_enable="YES"
#
# Spamassassin
spamd_enable="YES"
spamd_flags="-u spamd -H /var/spool/spamd"
#
# pf and fail2ban
pf_enable="YES"
pf_flags=""
pflog_enable="YES"
pf_rules="/etc/pf.conf"
fail2ban_enable="YES"

それから、/etc/mail/mailer.confの書き換えが必要。
具体的にはインストール時に発出される下記メッセージ

mkdir -p /usr/local/etc/mail
install -m 0644 /usr/local/share/postfix/mailer.conf.postfix /usr/local/etc/mail/mailer.conf

を実行すればok。具体的には

# $FreeBSD$
# postfix sendmail program, named /usr/local/sbin/sendmail
#
sendmail /usr/local/sbin/sendmail
send-mail /usr/local/sbin/sendmail
mailq /usr/local/sbin/sendmail
newaliases /usr/local/sbin/sendmail

という記述になる。

これはFreeBSD + Postfix + Dovecot 環境。
以上、備忘のため・

FreeBSDといえば、/etc/rc.conf

  • 投稿日:
  • by
  • カテゴリ:

ということで、メモを残す。

/etc/rc.conf

hostname="fbsd.smbdom.local"
# hostname="pi.homeunix.net"
# ifconfig_DEFAULT="DHCP"
ifconfig_genet0="inet 192.168.0.4 netmask 0xffffff00"
defaultrouter="192.168.0.1"
#
# ipv6_enable="YES"
# ipv6_enable="YES"
# ipv6_network_interfaces="auto"
#
sshd_enable="YES"
#
#
# ntpd
# ntpdate_enable="NO"
ntpd_enable="YES"
ntpd_sync_on_start="YES"
#
#
# postfix
postfix_enable="YES"
sendmail_enable="NO"
sendmail_submit_enable="NO"
sendmail_outbound_enable="NO"
sendmail_msp_queue_enable="NO"
#
# dovecot
# saslauthd_enable="YES"
# saslauthd_flags="-a sasldb"
dovecot_enable="YES"
#
## growfs_enable="YES"
#
# ddclient change 200407 NO
# ddclient_enable="YES"
## ddclient_enable="NO"
#
# tcsd
## tcsd_enable="YES"
## tcsd_mode="emulator"
## tpmd_enable="YES"
#
# Samba
# samba_server_enable="YES"
# samba_enable="YES"
# nmbd_enable="YES"
# smbd_enable="YES"
# winbindd_enable="YES"
# samba_server_config="/usr/local/etc/samba/smb4.conf"
#
# bind

# ntpdate_enable="NO"
ntpd_enable="YES"
ntpd_sync_on_start="YES"
#
# sendmail_enable="NONE"
# sendmail_submit_enable="NO"
# sendmail_outbound_enable="NO"
# sendmail_msp_queue_enable="NO"
#
# postfix
postfix_enable="YES"
sendmail_enable="NONE"
#
# dovecot
# saslauthd_enable="YES"
# saslauthd_flags="-a sasldb"
dovecot_enable="YES"
#
## growfs_enable="YES"
#
# ddclient change 200407 NO
# ddclient_enable="YES"
## ddclient_enable="NO"
#
# tcsd
## tcsd_enable="YES"
## tcsd_mode="emulator"
## tpmd_enable="YES"
#
# Samba
# samba_server_enable="YES"
# samba_enable="YES"
# nmbd_enable="YES"
# smbd_enable="YES"
# winbindd_enable="YES"
# samba_server_config="/usr/local/etc/samba/smb4.conf"
#
# bind
# Add the following lines to /etc/rc.conf to enable BIND:
named_enable="YES"
named_conf="/usr/local/etc/namedb/named.conf"
named_uid="bind"
#
# apache24
#apache24_enable="yes"
#apache24_http_accept_enable="YES"
#
# Spamassassin
spamd_enable="YES"
#
# pf and fail2ban
pf_enable="YES"
pf_flags=""
pflog_enable="YES"
pf_rules="/etc/pf.conf"
fail2ban_enable="YES"

それから、/etc/mail/mailer.confの書き換えが必要。

# $FreeBSD$
# postfix sendmail program, named /usr/local/sbin/sendmail
#
sendmail /usr/local/sbin/sendmail
send-mail /usr/local/sbin/sendmail
mailq /usr/local/sbin/sendmail
newaliases /usr/local/sbin/sendmail

これはFreeBSD + Postfix + Dovecot 環境。